Showing posts with label diy. Show all posts

Friday, December 13, 2013

It Only Took 5 Months...

When we last saw our heroines, they had finally removed all the paper from the bedroom walls (well, most of it, I wouldn't take down any of the trim if I were you...) and were fixing all the damage from removing the paper.

It all started with learning how to spackle (thanks YouTube!!)


Then taping and priming

Finally, paint. The guy who helped us at ACE hardware was super kind and patient and was able to give us a ton of good advice--things we rarely get at the big box hardware stores. Be warned, the color we picked for the room is blue. A damn bright blue. Brighter than I think either of us expected.
"I'm super bad-ass with my teeny-tiny roller"
Ellie was attacked by Smurfs!!


I cut in, Ellie rolled; a system that mostly worked out.
A second coat should do the trick...
And finally, FINALLY, we are able to sleep in our own room:
First time using the comforter we got for our wedding!
Some things we learned from our first attempt at redoing a room:
  • Sanding takes a lot more time than you anticipate. And it's really hard to make the wall smooth.
  • Do not use tape that is the same color as your intended paint
  • Two coats of paint make everything better
  • Furniture really helps break up solid blocks of color
  • Pick up the bits of wallpaper as soon as possible, because they will totally adhere to your hardwood floors
We're still trying to think of the best way to arrange the room--we have a baseboard heater along one long wall, an off-center window on a short wall, aren't quite sue how we'll eventually set up access to the closet on the other short wall, and neither of us seem keen on putting the bed on the wall that the door is on. We'll just keep moving furniture around until it feels right I guess.


Thursday, November 21, 2013

Wait, We Have 6 More Rooms of This?

It's been forever since we gave a house update, hasn't it? Well, we've had some setbacks, but I think we're on track again. We better be, because I really want to sleep in my own bedroom rather than my future walk-in closet!

As you may remember, when we moved in, the bedroom looked something like this:
Baby blue flowers, how nice
And then we discovered this:
Why WOULDN'T there be Jungle wallpaper underneath?
And this:
Notice that under Layer 1? Blue stripes on the other 3 walls!
We're making progress, right?
But Ellie really busted her ass (I helped!!) and before long, we were finally here:
No monster can scare us away from finishing!
Paper-free!
Right now, Ellie is we're finishing up fixing all the damage to the drywall that came from inexperienced wallpaper removers working on wallpaper applied to unprepped walls. Honestly, I think we'd be well done with this room (the walls at any rate, I want to consult with someone who has a clue when we decide to tackle fixing/replacing the trim) if the walls had actually been prepped before the first layer of paper was applied. But our inexperience lead to what was probably too much research on how to properly correct the damage which, added to the other setbacks, just delayed everything.

Over/under on getting at least one layer of paint up by the end of the weekend?

Tuesday, October 22, 2013

One More Wedding Project Finalized!

I lovelovelove the album we got through Erica--it's gorgeous and professional and I still can't believe we were able to narrow down all those pictures to just the 75-ish that are in there!

But then I looked at all the pictures from the Shower, and our Bachelorette parties, and the pictures from our friends and family and realized I could not let those go to waste sitting on our Shutterfly site with no purpose. And I thought about all the work we put into everything like selecting our vows and readings, creating our centerpieces and programs, etc; I didn't want to lose all that work. So I created another album, a scrapbook, to keep those memories close at hand.


Turn your favorite photos into a photo book at Shutterfly.com.


All that's left is to create a small shadowbox for some items, order a canvas portrait print, and get a frame for our Turks & Caicos souvenir map. Oh, and finish that cross-stitch I stated ages ago... It's funny to think that a year later and the wedding still isn't technically "done."

Wednesday, July 24, 2013

The Problem With Pinterest

Screenshot of my "Home Sweet Home" Pinterest page
Anyone who knows me knows that I have a small love affair with Pinterest. The affair began while planning the wedding, and is growing as we are working on the house.

The problem lies in having too much of a good thing. EVERY style known to man (and woman) is available on Pinterest, from the oh-so-trendy shabby chic (pallets & mason jars anyone?) to the super modern (hello metal and straight lines!) to everything in between.

I have no idea how I want to decorate my house.

I know I'm not in a rush (dear Gods do I know that), and we're really just tackling one room at a time, but I still want flow throughout the house, and fear making the place look completely out of sync with itself because there are SO MANY cool ideas out there. Everything matters, from wall paint to the color of the trim to the hardware on doors and windows. Then you get into the unending cycles of "If I stain the trim in the bedroom to match the oak floor, should I just go ahead with that in the other oak rooms too? But I like a darker dining room, and that's only laminate right now (should we look into laying hard wood to match the other rooms?), so it's a different color floor anyway. And if I do stain, that means pulling everything down, which will be good for actually lining things up since nothing is aligned--wold it just be better to buy new rather than strip and re-stain; or should I just take the easy route and paint...can I get a color of pain that will look okay enough to make up for the absence of natural wood.

It goes on from there, and not just about trim, but curtains/shades/furniture/arranging decorations/wall color/hardware/etc. I'm not naive about this, I know for a FACT these cycles would be happening without Pinterest or Young House Love, or Apartment Therapy. but I know they are contributing factors because I'm getting ideas I never would have thought of on my own (seal and paint a tree branch as a curtain rod?! HELLS YES!), which increases the possibilities. It's beautiful and terrifying. I guess we'll see what happens, right?

Monday, July 1, 2013

What We've Been Up To

It's funny, I feel like we have both been working our asses off and accomplished nothing in the last week. Yes, we have officially lived in our house for a week! Sunday, June 23 was the first night sleeping there, and as of 8pm on Monday, all of our things were in the house. I have to admit to feeling a little nostalgic for the apartment. *cue Bare Naked Ladies*


As much as I loved it, and for all the memories we made there, we knew it was only temporary.

In the house, we can really set down roots and make the place ours. Even before closing, we knew that the master bedroom would be the first room to get a makeover. I'm not going to say that the wallpaper in there was ugly--honestly, for wallpaper, it wasn't half bad. But it is wallpaper, in a baby blue flower pattern with years worth of cigarette smoke. One of the first things we did the day of signing was make our first foray into home renovation and begin to peel wallpaper. We were treated to a little surprise:

Jungle print UNDER the blue!
But that's not all folks, the lovely jungle print was only relegated to a single wall. The other three wall had this lovely paper:
Slow and steady wins the race, right?
As of tomorrow it will be 2 weeks since we got the keys, and I have to say that Ellie has been a wallpaper removing machine. Saturday night when we showed off the house to a friend, I discovered that we were down to the last layer of glue on 2.5-ish (I use really technical measuring tools) walls (pictures coming, I need to upload them). We are fairly confident that the paper will be all gone and the skim coat will be applied by the end of the week at the latest. I think we'll be able to actually set up our bedroom next week! *fingers crossed*

There is a lot of work to be done still, and maybe someday I'll get around to creating a Master List (a la Sherry & John at Young House Love), but I'm so thankful the house IS in living condition, and that all the "issues" are cosmetic.

Monday, August 27, 2012

Thank You!!

About a week before the Shower, we were out and I was all of a sudden hit by the realization that

WE HAVE TO SEND 2 THANK YOU CARDS!!


I don't know why this struck me as such a big thing. I know we'd discussed some ideas for the Wedding thank you's, but it never seemed to dawn on me that we'd have to send separate ones for the Shower (don't even ask, because I have no freaking idea...). We happened to be in Harvard Square that day and decided to look around. (Yes, Ellie TOTALLY thought I knew, considering this was one week before the shower itself). 

Cards are expensive yo.

And most leave something to be desired.

In the 2 different stores, we found some that were tolerable, and some that were amazing, but none that REALLY stood out. I think one of the problems with not really having a theme is that it's difficult to gather all the pieces and make them coherent--maybe we should have just ordered everything from the same company at the same time!!

But we didn't, so have been learning as we go. And when I really stop to think about it, if we had gone that route, I wouldn't have been able to get the most amazing invitations of all time from my co-worker!! I kind of shut down while we were on our hunting excursion, so Ellie did a little CBT and came up with an amazing idea: we would make the thank you's for the Shower and re-evaluate our ambition and desire to do a little more DIY as we got closer or just after the Wedding itself. She knows me so well--this would be a perfect opportunity to get rid of at least a little of the craft stuff we have, and take a good look at our stock to maybe prompt some re-organization or donation (both of which happened).


 Once Ellie got the design down, and we selected the colors/stamps/paper, it wasn't hard at all. I've only made a couple of cards in my life, but Ellie's the resident expert thanks to her Mom, so I let her lead (yes, it WAS difficult). She cut, I folded; she stamped the front, then I stamped the inside while she cut the other pieces.


Something I had never really thought of was using colored pencils to highlight the stamps (I knew Ellie and her mom enhanced their cards, but the how never really clicked). I think I did a halfway okay job with these little flowers.
We even dressed up the envelopes a little bit!

The responses to the cards was really nice, it almost makes me want to make the thank you's for the Wedding too, but I've found some nice ones online and don't know of the energy and cost to make them will outweigh the benefit of showing off our DIY talents.

Wednesday, July 4, 2012

Programs--Check (minus assembly)

Back in March, I did a  trial to determine the best kind of glue to use for my programs. Saturday, with the assistance of my Man of Honor, I finalized the programs. On Sunday, we printed a test batch to make sure it looked as good on paper as it did on the computer. One of the fonts is a little pixelated, but it's something that only a graphic designer or myself would notice, so we decided to go with it rather than finding a new font. Yesterday I did one last trial before we printed out 125 programs. I didn't want to print a large bunch out and then realize the bottom margins were off or anything. I had nothing to worry about:

Final Program Trial
All my supplies together-program, dowels w/caps, glue & clips to hold the dowels while it dries
Final Program
All together, the measurements were perfect!

If you are ever gluing something to a dowel, chip clips are your best friend! These are cheap-o dollar store clips, but they hold the dowels in place to let the glue dry--which is actually pretty quick. I recommend having 3-4 sets so you always have a free set as you assemble. It doesn't take a long time to dry, but you want to give it a few minutes.

Sunday, July 1, 2012

Dressing the Ladies' Hair

Karina came up from NYC to help with our dinner tasting and spend some time with us. Ellie took Saturday off from work, but left Karina & I together to make the hairclips that Karina and Carrie will be wearing. I have to admit to being VERY nervous about this--cutting those beautiful peacock feathers I'd bought was incredibly stress-inducing, I was terrified I'd make a mistake.

But K had taken the lead in making the facinators for another friend's wedding last year, and was totally confident in both of our abilities. Our plan of attack: get coffee, lay out all the supplies, and each of us make one--she'd make hers, I'd make Carrie's. Here's K just as we're getting started: Untitled

I had the feathers, hot glue, black felt and scissors--she had brought some costume jewelry she had lying around, as well as some beads  & other bobbles for embellishment (look, you can see my card box in that pic!--I'm storing smaller stuff in there for safety).

Each clip has 2 feathers and an old earring as it's bling aspect. I feel a little guilty not using any of the other beads & bobbles K brought, but I think they might have taken away from the clips (and we really couldn't think of a good way to incorporate them). Here are the cut feathers, the felt support backing and a bunch of the beads we had--you can kind of see the earrings towards the background of the picture. Man, I was NERVOUS about cutting those feathers down, but I did it, slowly. I kind of messed up in the length, then when I was gluing the top feather down, but it actually came up fairly well & I was able to re-position it.
Untitled

How we did it: we cut a teardrop out of black felt as a base, then glued one of the feathers to it. We positioned the other feather on top and slightly off-center & glued that down. K was really thinking and came up with the idea that, since they will be on different sides of the altar, the guests will see different sides of their heads, so it might be best to have the clips facing different directions! How glad am I she was able to help with this?!?! After everything was glued, we stuck an earring through the bottom, glued it to prevent it from spinning and bent down the post. I still need to find good clips to attach to them--K said I want ones with teeth to help with the hold, but I've yet to find any; the hunt is still on!

Untitled 

Tuesday, May 29, 2012

Oops!!!

So do it yourself projects are fun and exciting and it makes us feel like we are getting things done for the wedding. Until... we lose something. For our centerpieces there are three unique parts. One piece we ordered and have them set aside. Parts 2 and 3 are the same but we painted half blue and half we painted green. However, when we went to find the last of the green ones we could not locate them. We have torn our apartment apart no less than 7 times... Finally we came to the conclusion that we in fact might have painted 3/4 of the books blue and the reason we can't find the other 1/4 of the green is because they don't exist. So we ordered more and hopefully they are the same or at least really close.

Now the vests are being difficult. We thought this would be the easy part and in fact it is not. The vests we want have the wrong color back side...Sigh and my vest people did not seem to want to sell it to me. So we ordered that and I can't wait for that to come in. But what to do about the rented wrong backs... unless someone rents it differently. We need to set up a time and meet with the place in Braintree and hopefully this will put some of this at ease... Hopefully. These were two of the many little oops we will have. These two hopefully we will get past with out too many grey hairs. If not dying hair will be the next oops. ;-)

Saturday, May 12, 2012

Centerpieces--CHECK! (for real)

I've already posted what we plan to do for centerpieces, so I'm just going to nutshell it: small, battery-operated fountains placed on top of 2 paper-mache books which are painted in our colors (clover and sapphire). In that entry, I posted a picture of the unpainted centerpieces, now I can finally show the finished project!

Painting the Books
Painting the books--we used a blue and green paint we already have, so they don't match exactly, but who's REALLY keeping track, right?
Book Binding
They were lacking something, so we got a paint pen and I added binding lines
Finished Centerpiece
The finished project, with a couple wine glasses to show size
And that's that! Half the green books are missing in the pile of wedding crap, but once I find them, I'll add the lines to them and I'll be DONE-done, but I'm counting this as one DIY project off the books.
LOL! See what I did there? That wasn't even intentional. LOL, wedding planning is getting to my head...

Friday, March 16, 2012

Program Trial-Run

This was done eons ago, but I've just gotten around to posting. I wanted unique programs that people would remember for a while. Fans are being done to death, and I was adamant that, if we were to go that route, they be the kind that open, but I couldn't think of an effective means or keeping them from just spinning on their brad. Then I saw scrolls, mostly used as invitations, but MUCH better suited for programs IMNSHO. Fearing assembly mistakes with the real thing, I did a few trials with different types of glue (I may try a couple more types of adhesive, but we'll see). First, you need to gather your supplies; in this case--8.5"x14" cream colored paper, chip clips, 10" long dowels (which will be painted silver), & some type of table-protection:

  Programs-supplies

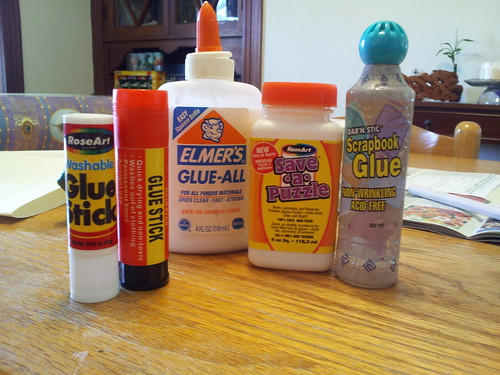
And don't forget your adhesives (I tried a few different ones before I was happy with the result): Programs-glues

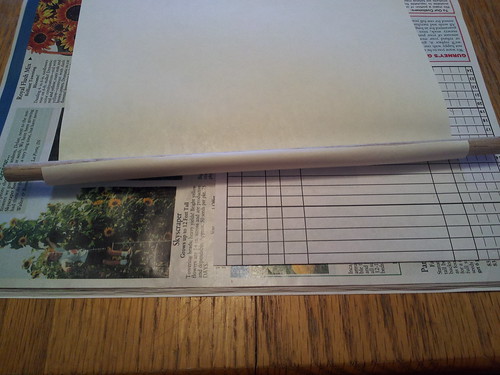
First, lay out your paper and put a line of your adhesive of choice on the edge, covering about an inch. Position dowel #1 JUST on the edge so there's some overlap: Programs-trial

Begin S-L-O-W-L-Y rolling the paper onto your dowel: Programs-rolling

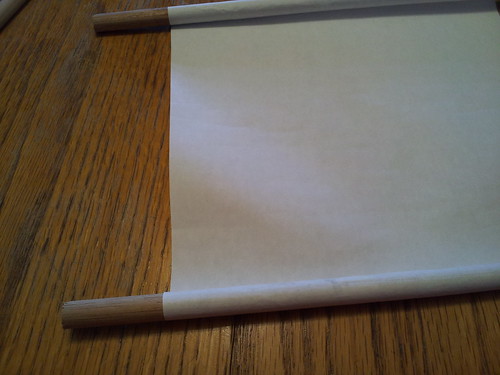
When you get the paper edge completely wrapped around the dowel, add more glue just in front of the dowel & continue to roll so the paper glues to itself, then secure with a chip clip or clothespins until the glue sets:
 Programs-RollingPrograms-drying

I found that Elmer's is too runny to get a smooth, tight wrap & I was left with wrinkles and they won't lie flat: Programs-Elmer's

Glue sticks are too hard? Programs-glue stick

I found that my best option out of the glues I tried was the scrapbook glue; and it dried really well too! The drying pic above is using the scrapbook glue, and it looks the best out of all of them. I can't seem to find the same kind though, so may have to try to find another brand. The nice thing about the one I used is that it has a rolling applicator rather than just squeezing a bunch of liquid & hoping it's not too much or little--a lot more control. Finally, some pics of the bulk wood order we made; a few dowels at the store aren't expensive, 75 are! We are also going to cap the dowels rather than try to sand them down, and those little babies are $4 for 2 in the store!!

Programs-Wood ShippmentPrograms-Dowels & Caps

Saturday, March 10, 2012

Home, or a UPS Warehouse?

Most of our "wedding supplies"
Go ahead, I dare you to click this image and see it full-size. Those of you who've been to our place know this shot--it's the sideboard in the dining room, which stands at my waist, around 2-1/2 feet high. right there, you can see the following: programs, centerpieces, part of our accessories, the card holder, our toasting glasses, and I'm sure some other odds & ends. And this isn't even everything we've bought! Our cake topper isn't boxed, so that wasn't included, nor did I include the box that's holding some of our supplies--paints, brushes, glues, etc. My dress is also not included because A) it's with the seamstress, & B) Ellie can't see it. OH! I forgot to include a few other details we've already bought, again because they aren't boxed & I don't want to spoil everything.

We have yet to buy favors, escort cards, Best People gifts, gifts for each other (well, I haven't bought Ellie's gift, I don't know if she's bought mine...I doubt it), my jewelry isn't done yet, and I'm sure there are other packages that will be arriving over the next seven months that I haven't even thought of!

When all this started, I don't think I realized just how much STUFF we'd be accumulating. It's not just the money either...it's mostly the stuff, and how it's taking over our home and life. We definitely have to go through it all and pack away what we won't be using until that day, get the DIY's done so we can also pack those away. At the same time though, it's comforting because now, after a year and a half of mostly talking, we're finally DOING something for the wedding. I never saw the point in making a lot of the purchases until we were closer because we have storage space, but not a LOT. I also had a fear of things getting damaged (because obviously we'd have a tornado, or a flood or something simply because the wedding supplies were bought too soon). Yes, my apartment is covered in boxes, which is a huge stress trigger to me. But those boxes represent something very special, something so much bigger than my anxiety and compulsions.

Friday, March 9, 2012

Centerpieces--CHECK!! (well, almost)

I don't like flowers. Let me correct that: I don't like CUT flowers--they are overpriced, overused and DEAD. So, I convinced Ellie that we didn't want the floral centerpieces included in our venue package taht guests couldn't take home & that we should do something awesome. She thought fountains would be nice, and the hunt commenced. Eons ago we found the fountain we wanted to use:


Now what to do with them? Being 4"x4"x6", they were going to get lost on the 8' round tables with all the glasses and whatnot. How were we going to lift them up? Going with the "Faerietale Forrest" idea, log slabs were our first thought, but ensuring they were all level so the fountains could work properly was going to be too difficult. Small baskets turned upside-down? Meh. Plastic display risers that you see in stores? SUPER expensive, and ugly to boot. Then, my dad gave me my birthday gift. The gift doesn't matter, the packaging does--a small (6"x4"x2"?) paper mache box that he had found in a box under my old bed!! He thought that my mom had brought them when she moved in during her cancer treatments, but I had bought tehm years ago for a craft project--the company had trippled my order & didn't want them back, so there they had sat for the last...6 years, still good as new.
Close enough; image from Jo-Ann Fabric & Crafts
Stacking two of these babies would be perfect AND stick to the theme. Sunday on my latest visit to my dad, I scooped up the books (3 boxes of 12--more than enough for our 15 tables) and brought them into The Wedding Zone. We're working on painting them now (hence the ALMOST done comment); one blue & one green for each table, with gold pages & maybe some gold embellishment on the spines, I'll have to look into that. Here's the demo, from the front & side, with some glasses to give an accurate depiction:
Centerpiece Trial-front
Centerpiece Trial-side


Tuesday, February 28, 2012

Random odds and ends

Tomorrow will be 7 months until our wedding. This is so exciting and scary at the same time. I am happy to say that in general I have not been procrastinating. We are doing a DIY program which has about 6-8 steps depending how you look at it. I have already started the steps that can be started at this time and we have ordered the remaining materials just yesterday. Tonight I plan to finish with the materials I have so that when the new materials arrive we can continue.

As Jessi mentioned we have ordered the wedding bands this was also completed a few weeks infront of schedule. I am excited about them and I am excited that yet again they are original and very "us" which is what I want from our jewerly.

We have agreed upon our song which I am very excited about now we just need to learn to dance a little bit better to it. ;-) I have decided on my shoes and now I need to go buy them or order them and break them in a little so I don't hate life by the end of the dancing night.

We have looked into an additional site to set up honeymoon activities so people can help us out with that as gifts. It is 3 weeks until we hopefully buy bridesmaids dresses and in early april the boys and I will be getting our little "suits." And then comes cake testing, entree tasting and final touches on our invitations which we have picked out. :-) It's all coming together and I know there is a million things left to do but so many are started and it really feels like it is coming together.

I can't wait until all my friends and family come together to celebrate this beautiful love that Jessi and I have. The wedding might be quirky, cheesy, and everyone might not understand all the little nuances that make it ours but that's okay. I'll know, Jessi will know and people that read this blog will have a little more inside information.

Thursday, September 29, 2011

Wedding Announcement Cross-Stitch

Image from eBay
I recently bought something wedding-related, but not FOR the wedding: a cross-stitch pattern!

Considering this, our Save the Dates, and the color inspiration it turns out that we're going to have a slightly royal-themed wedding, but not overly so--we just can't help but have castles involved considering where we got engaged and our love of Medieval/Renaissance faires and events. I'm going to keep it reigned in though because too often these things become a "themed wedding" (as opposed to a wedding with a theme) and no one really wants that.

Anyway, about the cross-stitch. This is not exactly what it's going to look like when I'm done; the J's and numbers on the left and right borders will be replaced with our wedding date. Instead of it being a sampler, I'm going to put our names and some overly-sentimental quote, probably from whatever song we pick to be our first dance, in the open space.

I just got the pattern in the mail, and this is probably going to be the most ambitious project I've ever taken on. I've only tried one that might be close, but I never finished it, and never will. I almost want to start taking an over-under for completing it before the wedding (which is 366 days away--stupid leap year!). Tonight or tomorrow I will buy the fabric (Ellie already got most of the thread, yay!!). Maybe I'll try to post monthly updates as a means of self-motivation and accountability.

Saturday, July 30, 2011

It's Crunch time!!! (Random Post)

Okay it's not really Crunch time, but it sounds so forceful... or like I want a chocolate bar. MMM, Chocolate. Anyway, I don't post much but honestly I think about the wedding A LOT. The problem with wedding planning is the hurry up and wait aspect of it. I get too excited when we plan something and then I want the wedding to be tomorrow so I don't have to wait any more. As Jessi has mentioned we are finalizing our order for save the dates, which the only reason I think we haven't ordered them is because we have been slightly lazy and addicted to the TV show Weeds. Luckily for our friends and family we are almost out of the seasons and after the withdrawals we will finally be able to order them.
Second order of business is the whole weight loss thing. I don't need to be little I just want to look better in my little outfit and be in prime dancing poorly shape. I know Jessi and I are eating better most nights and are trying to put exercise back into our lives. Over the last month it's been really difficult. But a pound a month would put us both down 14 lbs which we both would be happier with.
I struggle a lot with the desire to be unique and to be wise with money and environmentally friendly. The three of those are difficult to combine, often I see something unique and environmentally friendly but then it's 5 billion dollars. (dramatic for effect) Sometimes I wonder what people "expect" from my wedding, if anyone ever thought about it. I know that our wedding needs to be us and what we want but it's interesting to think about. It's like when I bought my first car, Nissan Maxima, everyone saw it and said, that car doesn't fit you... (They were all out of clown cars apparently) I really want this ceremony to really capture Jessi and I and the reasons we fell in love and the sparks that keep us growing.

Monday, February 21, 2011

Details and DIY

Something I recently thought about is that fact that I CAN'T post many of the details, or any of the DIY here because I want it to be a surprise.In light of that, I have taken down the "Details and DIY" page (it's been replaced by an FAQ!!)

Luckily, I'm a member of a few wedding sites where I can discuss those type of things and receive feedback without sharing it with everyone and ruining the surprise. Maybe, after the wedding, I'll upload all of that information for posterity and the sake of keeping it all in one place.

Wednesday, February 16, 2011

Money and Etsy and DIY Oh My!!

One of the things I feel really strongly about in regards to the wedding is that we spend our money wisely. Too many people spend their money on (what I think are) frivolous things like ice sculptures, hordes of favors, or an abundance of flowers and candles that you are begging your guests to take at the end of the night. It's one of the reasons I am asking reception venues if we have the ability to not take some of the options (like an ice sculpture or a "toss bouquet" or whatever) and roll that money back into the cost of the reception and get the things I do want (like an open bar, or maybe an extra hot appetizer). It's also why I am very much into the idea of DIY and/or buying through Etsy.

Something that's been helpful in idea-gathering is the Wedding Wednesday Etsy Find posted weekly by Amanda at MrDrew Photography. One of my favorites was her post about a woman that makes headpieces, bouquets and boutonnieres using handmade flowers and vintage pieces. I can't say I'm definitely going to buy anything from this shop, but seeing Amanda's post made me start to think about some options I have for flowers that aren't just faux flower centerpieces. She hasn't been doing this feature very long, only a few weeks, but I'm excited to see what she blogs in the future.

Saturday, October 16, 2010

Having Recently Been to a Wedding...

I now have something fresh to go by in my planning. I'm not saying that J & E's wedding will determine how we do ours, but it's been several years since I've been to a wedding and having one fresh in my mind makes it more active and clear. Plus, it's gotten me really excited because we had a ton of fun and I'm looking forward to actually making plans and bringing this whole thing to life.

I need to start actually jotting down notes in my organizer. AND I need to stop stressing about everything--it's further away than I want it to be and I really do need to worry about Christmas first. After the holidays Ellie and I will start physically looking at venues--I would really like one booked before the summer, just to ease my anxiety and allow me to take my time finding that damn elusive dress!! Honestly, booking the venue will actually move a lot of things forward because we'll know when/where, if we need a second site and/or hotel, and the food/beverage situation won't be as much of a mystery. Plus, it'll guide our theme and we can start with all the DIY that will need to be done (I'm really looking forward to the DIY stuff actually; I'm such a geek).